Hamstring Strain
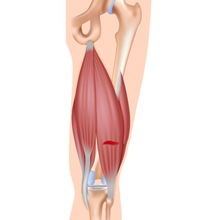
 One of the best parts of the day is a good workout or playing sports in everyday life. However, one of the most frustrating injuries that can happen is a sharp pain in the backside of the thigh. Those moments are the start of a potentially long recovery process. Hamstrings are one of the most common muscle groups injured. The Hamstrings are four distinct muscles that are on in the back of the thigh that enable your knee to bend and the hip to extend backward. A hamstring strain is an affliction or injury where one of these muscles gets stressed excessively or even torn. If the strain or tear continues to worsen from stressful activity, it can become a nagging injury that can last much longer than anyone wants.
What are the Grades of Hamstring Strains
There are three distinct grades of a hamstring strain:
Grade I Hamstring Strain
This classification is a small or mild muscle strain. There may be some disruption of the muscle fibers and it may be sore for 1-2 weeks. Walking is usually pain free and this type of injury heals well with time and gentle activity.
Grade II Hamstring Strain
A partial tear of the hamstring muscles that can leave a bruise and limit walking for a short period of time. This type of injury may leave a feeling of “a knot in the muscle” for a few weeks. Running, stairs, and walking fast may be uncomfortable. This can leave the hamstring at risk for further injury and should be treated with conservative care.
Grade III Hamstring Strain
Regarded as a complete hamstring muscle tear or the tear of a corresponding muscle attachment at the Ischial tuberosity or on the Femur. This injury will bruise significantly and will be quite painful at least initially. This may require surgery in some or most cases and will take months of recovery after.

Symptoms of a Hamstring Strain
There are a number of symptoms that would be indicative of a Hamstring strain. From sudden pain in the general thigh area to bruising, there are symptoms of various degrees:
- Pain that comes in a sudden or severe manner during stressful activities such as exercise.
- A feeling that is characterized by a popping sensation.
- Mild tenderness in the thigh or lower buttock area.
- Bruising of hamstring muscles.
Tips to Make a Full Recovery After a Hamstring Strain
Avoid Long Duration Static Stretching
Even though stretching can be beneficial for other injuries, long duration stretching is not recommended in the early phases of a muscle strain. You want to work on getting back your range of motion but without tearing and re-injuring the site of muscle injury.
Try a Compression Sleeve
A compression sleeve is great way to decrease pain and help to get back to daily life faster. Compression sleeves help decrease swelling while keeping blood flow to help with healing while calming down the nervous system. See our review of the best compression sleeves for hasmtring strains.
Stay Active without Aggravating
Even though these injuries are quite painful, it is imperative that you stay active. Try to continue to move the leg at home, walk as much as you can, and let tolerance to activity be your guide. By staying active the repaired muscle will be stronger, will be less likely to be re-injured, and decreases pain levels faster.
Allow for Adequate Healing and Don’t Stress it too Soon
Hamstrings are famous for having high re-injury rates. These injuries are quite painful initially but begin to feel better around 6-8 weeks later. It’s at this time that people want to get back to testing their injury with running and jumping but it takes 10-12 weeks for a ful recovery. Try to let everything heal and go through the whole protocol.
The Best Exercise for Hamstring Strains
The good news is that there are various exercises that you can perform in order for your hamstring to be healed. It is important to do the right exercises at the right time depending on the severity of the strain. Here are some key exercises that can assist you below:
Phase 1: Exercises Immediately After the Hamstring Strain
Terminal Knee Extensions
This exercise is performed with the advent of a resistance band by tying it against a pole and positioning the band behind your knee.
- You will then proceed to flex your knee against the band at a 30 to 45-degree angle and return your leg to the starting position.
- It is important to keep both of your heels in contact with the floor throughout the movement.
- You should be focused on flexing your quadriceps.
Quad Sets for Full Knee Extension
- This exercise is done by first laying flat on the floor or with a soft workout mat and your legs stretched out.
- Next, you will proceed to lift up one leg in the stretched-out position up to your abdominal region as much as you can and then return your leg to the starting position.
- You subsequently repeat the second step with your other leg and repeat the steps as needed.
- Always make sure to keep your shoulders down on the mat during the course of the exercise
Hamstring Isometrics
- For this exercise, you will need to lay flat with your stomach facing down and your legs stretched out on an appropriate surface such as a workout bench or an equivalent device.
- First, you will lift up one leg at a slight angle.
- Secondly, you will then contract the muscle, hold your leg in the angled position and proceed to relax the hamstring muscle.
- Thirdly, your foot should be rotated to target different areas of the hamstring.
- Fourthly, you will turn your body over in the face-up position and engage in static contractions with hip extensors. Your leg will be locked in over a higher surface (such as a bar or with the assistance of a friend) and you will then proceed to flex your core region and stretch your hips by pushing your body up in order to stretch the hamstring muscle.
- It is best to engage this exercise with the assistance of a friend or use your other leg as resistance.
Phase 2: Exercises 4-6 weeks after A Hamstring Injury
Prone Hamstring Curls
- For this exercise, you will need to lay in a prone position with a workout mat and your legs stretched out. You will need to have your leg where your hamstring injury is located tied to a workout band.
- First, you will stretch your leg as much as you can towards your lower back.
- Secondly, you will proceed to hold your leg in that position for a few seconds and then return it to the starting position. This step is what stretches your hamstring muscle.
- You will then repeat these steps as needed.
Hamstring Curls on a Swiss Ball
For this exercise, you will need a workout ball.
- First, you will lay flat on your back with your hands at your sides and position your feet on top of the workout ball by stretching out your legs. Make sure that your toes are facing up and not inward or outward.
- Secondly, you will then proceed to bridge your body in this position where your buttocks and core muscles will be tightened.
- Thirdly, you will lock your hips in their current position and proceed to bring the workout ball inward toward your hips by curling in your legs and using your heels to bring in the ball. When you curl the legs inward, it stretches the hamstring muscles.
Isometric Squat Holds
- Your back will need to be up against a wall to engage in this exercise.
- First you will lean against the wall and proceed to slide down into a squat position. Your knees should be in a 90 degree angle with your thighs parallel to the floor.
- Secondly, you will keep your back flat against the wall with your hands at your right and left sides away from your thighs.
- Thirdly, maintain this position by using the pressure from your back against the wall. You will hold this position for a set time before enabling your legs to relax.
Phase 3: Advanced Hamstring Strengthening to Prevent Re-Injury
Nordic Hamstring Curls
 You will need a workout mat and something sturdy to put your feet under.
- First, you will need to get on your knees and ensure that your legs are stretched out behind you for support. The individual that is assisting you will proceed to lock your ankles in place.
- Secondly, you will cross your arms like an Egyptian mummy and proceed to slowly lean forward. As you achieve control, you can proceed to fall from a safe distance to the mat.
- Thirdly, repeat the exercise as needed.
- This exercise aims to stretch out your hamstrings against the resistance that is applied from this exercise.
Single-Leg RDL’s
For this exercise, you will want to use a dumbbell or kettlebell.
- First, the object of choice that you will be grabbing for the exercise should be next to the foot that you will be standing on.
- Secondly, you will hinge at your hips and stretch your free leg (the one where the hamstring strain was located) back up against the wall. At the same time, you should stretch out your arm that is opposite of the leg that you are standing on in a downward motion in order to pick up the object.
- Repeat steps accordingly as needed.
- To recap, your hips will hinge backwards as you stretch your free leg back towards the wall while your arm aims to pick up the object. Make sure that you are not reaching for the object but pivoting your arm down while stretching your leg against the wall to pick up the kettlebell or dumbbell.
Jumping: Box Jumps
- Make sure that you are utilizing a box or an elevated service for this exercise.
- First, you want to start out by standing in front of the box or elevated surface. You can warmup by practicing your hip extensions and by waving your arms up and down.
- Secondly, you are going to drop your hips back and keep a tall spine. You should also drop your arms back while dropping your hips back at the same time to help propel your jump.
- Thirdly, explode through your hips as you swing your arms forward and lift up your knees towards your chest as you jump on the box or elevated surface.
- Fourthly, you want to stand up fully when you hit the top and then proceed to jump back down with your knees out, feet tightened, and your torso upright.
Sprinting: Sprint Progression
There are three distinct positions that sprinters hit during the exercise:
Heel to Hamstring (Recovery)
- In this position, your heel should be coming up directly to your hamstring.
Hit the Top (High Knee)
- Your knees need to be at the proper height for this position and your toes need to be up. Basically, each stage of progression emphasizes getting your knees to attain a height that reaches hip level.
- This helps to stretch out your hamstring muscles with the high knee extension. You want to make sure through each stage that your feet hit the ground below your hips.
- When done successfully, your heel will be in line with your hamstring muscles accordingly.
- There are three stages of progression in this sprinting stage: Walk, Skip, then Run.
- In the walking position, you will lift up each knee in a curled position at hip level while progressing forward. You will alternate with each knee.
- In the skipping state, you will follow the same motions at a slightly faster pace. The important thing to consider is then when your knees reach at the height of your hip, your hamstring muscles are getting stretched.
- In the running state, your heels will be engaged in a cyclical motion. You should follow the same range of motion at a running pace that is comfortable for you.
Underneath (Negative Foot Speed):
- For this stage, you will be engaging in a straight leg pull-back motion. You want to make sure to stand tall and not lean back.
- Basically you will bring each leg out straight out by alternating your steps accordingly in a walking motion.
- A good example might be the imagery where one thinks of how a robot from a 1950s science fiction film might walk.
In conclusion, the important thing with choosing the right exercise for you is which phase your injury is categorized. Always make sure that you follow the proper time frames and instructions to properly rehabilitate your hamstring muscles. Ultimately, you should do what is best for you in the long run. When done correctly, these exercises will help you avoid an annoying strain that is a real pain in the butt.
Disclaimer: The information provided in this post is for educational purposes only. This is not a substitute for a medical appointment. Please refer to your physician before starting any exercise program.


