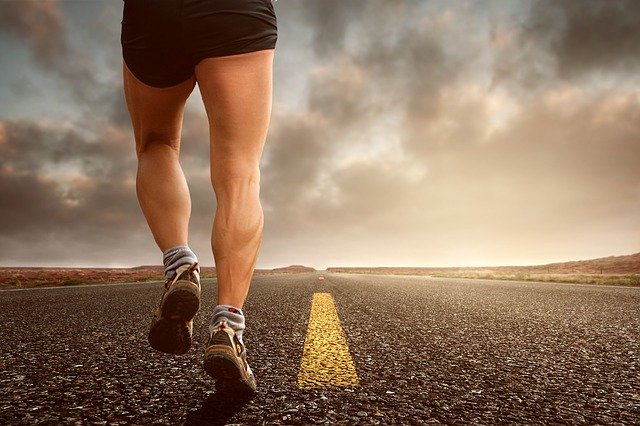
 The calf muscle, formally known as the gastrocnemius muscle, is located on the back of the lower leg above the Achilles tendon. Injuries to this muscle are fairly prevalent; the most common of which is a calf tear. The calf muscle is prone to injury because it crosses two joints (the knee and ankle) and due to the particular types of muscle fibers that make it up (1). Although calf tears occur across all age ranges, those at highest risk are individuals between forty and sixty years old who partake in recreational activities on a less consistent basis (2). This injury can be greatly limiting and frustrating. Additionally, as with most injuries, the recovery period can be long and challenging. This guide seeks to provide you with some knowledge and techniques to help you overcome this injury and get you back to your normal activity level more quickly.
What is a Calf Strain
The portion of the calf muscle most prone to tearing is where it attaches to the Achilles tendon (3). The tear most often occurs when an individual performs actions that require forceful shortening or sudden lengthening of the calf muscle. A few examples of these activities include basketball, hill running, and tennis. Individuals who experience this injury usually describe a quick, sharp pain on the inside aspect of the calf (3). 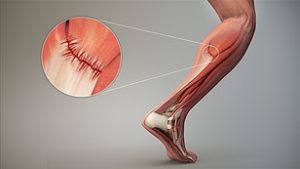
Grades of a Calf Muscle Tear
Grade 1 Calf Tear
A grade 1 calf tear is the most common. This is a mild injury, mainly a ‘pulled muscle’, and it may only take about 1 to 3 weeks to heal (4).
Grade 2 Calf Tear
A grade 2, or second degree, calf tear is greater in severity but does not result in the calf muscle being completely torn. Recovery typically takes 3 to 6 weeks (4).
Grade 3 Calf Tear
The result of this injury is the complete separation of the muscle-tendon unit. It can take several weeks to fully recover from this type of tear.
Symptoms of a Calf Tear
As previously mentioned, individuals who have suffered a calf tear described a sudden sharp pain at the back of the leg, possibly accompanied by an audible “pop”. Other symptoms this injury include:
- Muscle tenderness
- Swelling
- Bruising
- Difficulty in contracting the calf muscle
- Walking with a limp
Tips for Healing after an Acute Calf Strain
Even though a calf strain can be painful and limit your mobility there are some steps that you can take to speed up the healing process and decrease pain levels.
Walking Boot
A Controlled Ankle Motion (CAM) boot or a walking boot may be needed and recommended for most grade 2 and grade 3 calf strains. The walking boot helps keep the ankle locked and doesn’t allow for the calf muscle to be further damaged. This is great for anyone that has to get back to work or be on their feet. We have done an extensive review of the best walking boots which can be seen here.

Crutches
Crutches are often needed for the first few weeks after a grade 2-3 tear. Crutches are actually inexpensive when you shop online. If you are unable to walk without limping then crutches are recommended until you can walk normally. Our favorite crutches are the Mobilegs because they are lightweight yet sturdy, making them the easiest to use to get around.

Compression Sock
Wearing a compression sock after a calf injury helps speed up healing in a couple of ways. First, it helps control the pain and swelling by pressing the swelling back up to the heart. Secondly, the compression helps with pain by providing a little extra support on the injuries sight. Both which help speed up the healing process and improve recovery.

What To Avoid After a Calf Strain
No Static Stretching
Even though it will feel like your range of motion is decreased, it’s important for the first few weeks not to hold a prolonged stretch in your calf. This can damage the muscle fibers are newly healing and delay the recovery process. Doing normal range of motion exercises is the better option without hold one stretch for much longer than a few seconds until it has had time to heal.
No Heel Raises
Heel/calf raises are great exercises, however immediately after a calf strain. You want to wait for a few weeks before doing any sort of calf strengthening exercises. Make sure that you can walk without a limp, go up a few stairs, and hold a single leg balance before trying to do calf raises for strengthening.
No Limping
This goes back to the crutches mentioned earlier. Depending on the severity of the injury, you may need to use crutches for 2-4 weeks. For mild cases, you might not need crutches at all. It’s important to use the crutches or the walking boot until you can walk normally without a limp. Limping means the muscle isn’t ready to accept a load, and limping can cause problems in other joints, especially the low back.
The Best Exercises After a Calf Muscle Tear
Phase 1: Acute Recovery of a Calf Strain
Ankle Pumps
This exercise is effective at helping to remove some of the fluid and swelling that may be present from the injury. Come to a seated position on a mat with your leg stretched out straight in front of you. Bend your ankle so that your toes point back towards you, then bend your ankle in the opposite direction so that your toes point away from you. Repeat this process for 30 to 60 seconds as tolerated.
Sub-Max Plantar Flexion Isometrics
Sit comfortably in a chair with your foot in front of you and place your heel on the floor. Slowly bring the front of your foot towards you, keeping your heel on the floor. Stop if you encounter any sharp pain. Hold for a few seconds and then return to the starting position. Next, move the front of your foot forward, pointing your toes toward the floor. Again, stop the movement if you encounter any strong pain. Hold this position for a few seconds and then return back to the starting position. Aim for around three sets of 10 reps.
Towel Scrunches
Begin this exercise by sitting in a chair on a smooth floor with a towel spread out in front of you. Place both feet on the towel and use your toes to gather the towel towards you. Once you completely gather the towel then spread it out and start over. Aim for 60 seconds and gradually work your way up to 5 minutes. For an added challenge you can place a weight at the end of the towel.
Phase 2: Sub-Acute Recovery of a Calf Strain
Resisted Ankle Dorsiflexion
Sit on a mat with your leg stretched out in front of you and your arms slightly behind you for stability. Tie a resistance band to a stable object in front of you and make a loop at the end of the band. Place the loop over the front of your foot and bring your toes toward your knee in order to bring tension to the band. Release the tension slowly and continue to bring your foot back and forth. Aim for three sets of 10 repetitions.

Resisted Ankle Inversion and Eversion
Sit in a chair and tie a resistance band around a table leg. Then loop the resistance band around your foot. Next, move the front of your foot away from the table, pivoting on your heel. After you have completed 10 reps then move your foot to the other side of the table leg and loop the band around your foot again. Move the front of your foot away from the table by pivoting on your heel. This exercise helps to target the inner and outer muscles of the calf.

Double Leg Calf Raises
Stand on a flat surface with your feet shoulder-width apart, pointing your toes forward. You may want to have a chair or table in front of you for stability. Next, raise yourself up onto your toes and hold this position for two to three seconds and then slowly return back to the starting position. Perform three sets of 10 reps.
Phase 3: Long Term Ankle Strengthening
Eccentric Calf Raises
Stand on a stool with the front half of both feet on the stool. Then raise up onto your toes and lift the foot of your non-injured leg off of the stool as you lower yourself down on your recovering leg. As you lower yourself, allow your heel to go slightly below horizontal. Aim to perform three sets of 15 reps for four times per day.
Single leg Balance
Stand on one leg with your back and head upright, maintaining a neutral spine position. Stretch the non-balancing leg in front of you and then return and stretch to the side. Bring the leg back towards you and then stretch the leg out behind you. Ensure that you keep your hips level and then return to the starting position.
Lunges
In a standing position move one leg out in front of you and place your foot on the ground. Then, stretch the opposite leg slightly behind you. Next, drop your body straight down, keeping your body upright and looking straight ahead. Make sure that as the knee of the back leg drops, it stays behind the heel of the other foot. Shoot for three sets of 10 reps.
Step-Ups on Bosu ball
Place a Bosu ball on the floor with the ball side facing upward. Step forward onto the ball with one foot, then bring the other foot forward and then step back with that same foot and drop down slowly into a lunge. When lunging, make sure that your knee is dropping straight down and that it is directly under your hip. This is what’s known as a backward lunge. Conversely, in order to do a forward lunge, you will need to stand in front of the Bosu ball. Next, bend one leg back and rest the toes on the Bosu ball and place your other foot in front of you. Then drop down into a lunge, making sure that the knee of your front leg does not pass in front of the ankle. If this occurs, move the front foot forward slightly.

Squats on Bosu
Begin these squats by standing up straight on a Bosu ball with your feet shoulder-width apart. Then come down into a squat position, similar to the movement of sitting in a chair. Be sure to maintain good posture with your upper body and avoid leaning too far forward. You should be looking directly ahead. Add dumbbells for an added workout.
Conclusion
A calf tear can be a difficult injury to overcome. The time of recovery can range from a few weeks to a couple of months and there could be many challenges along the way. However, if you follow the advice outlined above your recovery will be greatly enhanced and you can be back to your favorite activities in no time!
Works Referenced:
- Bryan Dixon J. (2009). Gastrocnemius vs. soleus strain: how to differentiate and deal with calf muscle injuries. Current reviews in musculoskeletal medicine, 2(2), 74–77. https://doi.org/10.1007/s12178-009-9045-8
- Fields, Karl & Rigby, Michael. (2016). Muscular Calf Injuries in Runners. Current Sports Medicine Reports, 15, 320-324. https://doi.org/10.1249/JSR.0000000000000292
- Pakzad, Hossein MD. “Calf Muscle Tear.” Foot Education. Last edited October 2018. https://footeducation.com/calf-muscle-tear-gastrocnemius-tear/
- Petruska, Alex. Calf Strain. Boston Sports Medicine & Research Institute. http://www.bostonsportsmedicine.com/pdf/protocols/calf_strain.pdf
Disclaimer: The information provided in this post is for educational purposes only. This is not a substitute for a medical appointment. Please refer to your physician before starting any exercise program.